Building a Claude Code Plugin with Hooks
A practical guide to Claude Code's plugin system - hooks, skills, and commands. I built Claude Overflow to learn how it all fits together.
Peter Oliha
Claude Code has a plugin system that lets you extend its behavior. Hooks run shell commands at specific points in a session, skills give Claude new capabilities, and commands let users trigger actions directly. The documentation covers each piece, but I wanted to see how they work together.
So I built Claude Overflow - a plugin that turns your AI conversations into a personal StackOverflow-style knowledge base. Every technical Q&A gets saved as a markdown file and served in a searchable web UI.
Is it practical? Debatable. But it uses every major plugin feature, so it's a good way to learn the system.
Plugin Structure
A Claude Code plugin lives in a directory with a specific structure:
claude-overflow/
└── plugin/
    ├── .claude-plugin/
    │   └── plugin.json          # Plugin manifest
    ├── hooks/
    │   └── hooks.json           # Lifecycle hooks
    ├── commands/
    │   └── overflow.md          # Slash command
    ├── skills/
    │   └── overflow/
    │       └── SKILL.md         # Model-invoked skill
    └── scripts/
        ├── setup.sh             # Called by SessionStart
        └── cleanup.sh           # Called by SessionEnd
The .claude-plugin/plugin.json is the manifest:
{
  "name": "claude-overflow",
  "description": "StackOverflow-style Q&A archiving",
  "version": "2.0.0"
}
You load the plugin with:
claude --plugin-dir /path/to/claude-overflow/plugin
Hooks: Running Code at Lifecycle Events
Hooks let you run shell commands when specific events occur. Claude Code supports three hook types:
- SessionStart - Runs once when a session begins
- UserPromptSubmit - Runs every time the user sends a message
- SessionEnd - Runs when the session closes
Here's how Claude Overflow uses all three in hooks/hooks.json:
{
  "hooks": {
    "SessionStart": [
      {
        "hooks": [
          {
            "type": "command",
            "command": "bash \"${CLAUDE_PLUGIN_ROOT}/scripts/setup.sh\"",
            "timeout": 120
          }
        ]
      }
    ],
    "UserPromptSubmit": [
      {
        "hooks": [
          {
            "type": "command",
            "command": "echo '{\"hookSpecificOutput\":{\"hookEventName\":\"UserPromptSubmit\",\"additionalContext\":\"For technical questions, use the overflow skill.\"}}'"
          }
        ]
      }
    ],
    "SessionEnd": [
      {
        "hooks": [
          {
            "type": "command",
            "command": "bash \"${CLAUDE_PLUGIN_ROOT}/scripts/cleanup.sh\"",
            "timeout": 10
          }
        ]
      }
    ]
  }
}
The ${CLAUDE_PLUGIN_ROOT} variable points to your plugin directory.
SessionStart: Setting Up the Environment
When a session starts, I need to:
- Create a temp directory for this session
- Copy the Nuxt template
- Install dependencies
- Start the dev server
- Tell Claude where to save files
The setup script handles this:
#!/bin/bash
set -e

# Parse session_id from stdin JSON
INPUT=$(cat)
SESSION_ID=$(echo "$INPUT" | grep -o '"session_id"[[:space:]]*:[[:space:]]*"[^"]*"' | sed 's/.*"session_id"[[:space:]]*:[[:space:]]*"\([^"]*\)".*/\1/')

SESSION_ID="${SESSION_ID:-$$}"
OVERFLOW_DIR="/tmp/claude-overflow-${SESSION_ID}"
PLUGIN_ROOT="${CLAUDE_PLUGIN_ROOT:-$(dirname "$(dirname "$0")")}"
PORT=4242

# Find available port
while ! is_port_available $PORT; do
    PORT=$((PORT + 1))
done

# Create directory and copy template
mkdir -p "$OVERFLOW_DIR"
cp -r "$PLUGIN_ROOT/template/"* "$OVERFLOW_DIR/"
mkdir -p "$OVERFLOW_DIR/content/answers"

# Install and start
cd "$OVERFLOW_DIR"
pnpm install --silent
nohup pnpm dev > /tmp/claude-overflow-${SESSION_ID}.log 2>&1 &
sleep 3

# Output config for Claude's context
cat << EOF
{
  "hookSpecificOutput": {
    "hookEventName": "SessionStart",
    "additionalContext": "[CLAUDE OVERFLOW CONFIG] Content path: ${OVERFLOW_DIR}/content/answers | Server URL: http://localhost:${PORT}"
  }
}
EOF
The key is the JSON output at the end. The hookSpecificOutput.additionalContext gets injected into Claude's context, so it knows where to write files.
UserPromptSubmit: Injecting Reminders
Every time the user sends a message, I inject a reminder:
{
  "hookSpecificOutput": {
    "hookEventName": "UserPromptSubmit",
    "additionalContext": "For technical questions, use the overflow skill."
  }
}
This nudges Claude to use the skill for technical Q&A. Without it, Claude answers normally but doesn't save anything.
SessionEnd: Cleanup
When the session ends, kill the dev server:
#!/bin/bash
pkill -f "/tmp/claude-overflow-.*/node_modules" 2>/dev/null || true
echo '{"message": "Claude Overflow server stopped"}'
Each session is isolated in its own temp directory, so cleanup is straightforward.
Skills: Giving Claude New Capabilities
Skills are markdown files that define capabilities Claude can invoke. They're different from commands - skills are for Claude to use programmatically, commands are for users to trigger directly.
Here's the overflow skill in skills/overflow/SKILL.md:
---
name: overflow
description: Write technical Q&A responses as markdown files to Claude Overflow.
---

# Claude Overflow Workflow

Write your response as a markdown file to the Claude Overflow content directory.

## Step 1: Get Config from Context

Look for the `[CLAUDE OVERFLOW CONFIG]` message from session start. It contains:

- **Content path**: Where to write markdown files
- **Server URL**: Where answers are viewable

## Step 2: Generate File Details

- **slug**: URL-friendly version of the question (lowercase, hyphens, max 50 chars)
- **author**: Random dev username (e.g., `code_ninja_42`, `vim_wizard`)
- **votes**: Random number 5-200

## Step 3: Write the File

Write to: `{content_path}/{slug}.md`

Format:
\```markdown

---

title: "The user's question here"
description: "Brief summary"
slug: "the-slug"
createdAt: "2024-01-15T10:30:00Z"
author: "random_username"
votes: 42
tags:

- javascript
- async
  comments:
- username: "another_dev"
  content: "Great explanation!"
  timestamp: "2024-01-15T11:00:00Z"

---

Your complete answer here with code examples.
\```

## Step 4: Confirm

After writing, tell the user:

> Answer archived! View at {server_url}/answers/{slug}
The skill tells Claude exactly what to do: read the config from context, generate metadata, write a markdown file with specific frontmatter, and confirm to the user.
Claude uses its native Write tool to create the file - no MCP server needed.
Commands: User-Triggered Actions
Commands let users explicitly trigger skills with /command. Here's commands/overflow.md:
---
name: overflow
description: Answer a technical question and save it to Claude Overflow
arguments:
  - name: question
    description: The technical question to answer
    required: true
---

Answer the user's technical question and save it to the Claude Overflow archive.

## Steps

1. Get config from the `[CLAUDE OVERFLOW CONFIG]` context message
2. Generate a URL-friendly slug from the question
3. Write a markdown file with the answer
4. Tell the user where to view it

## Question

$ARGUMENTS
Now users can explicitly save answers:
/overflow What is the difference between map and filter in JavaScript?
The Web UI: Nuxt Content
The template is a simple Nuxt 4 app with Nuxt Content. When Claude writes a markdown file to the content directory, Nuxt Content picks it up immediately via hot reload.
The questions list page queries all answers:
<script setup lang="ts">
const { data: answers } = await useAsyncData('answers', () =>
  queryCollection('answers').order('createdAt', 'DESC').all()
);
</script>

<template>
  <div class="space-y-4">
    <NuxtLink
      v-for="answer in answers"
      :key="answer.slug"
      :to="`/answers/${answer.slug}`"
      class="block p-4 border rounded hover:bg-gray-50"
    >
      <h2 class="text-lg font-medium">{{ answer.title }}</h2>
      <div class="text-sm text-gray-500">
        {{ answer.author }} · {{ answer.votes }} votes
      </div>
    </NuxtLink>
  </div>
</template>
The detail page renders the markdown content with generated comments:
<script setup lang="ts">
const route = useRoute();
const { data: answer } = await useAsyncData(`answer-${route.params.slug}`, () =>
  queryCollection('answers').path(`/answers/${route.params.slug}`).first()
);
</script>

<template>
  <article v-if="answer">
    <h1>{{ answer.title }}</h1>
    <div class="meta">{{ answer.author }} · {{ answer.votes }} votes</div>
    <ContentRenderer :value="answer" />

    <div class="comments" v-if="answer.comments?.length">
      <div v-for="comment in answer.comments" :key="comment.timestamp">
        <strong>{{ comment.username }}</strong
        >: {{ comment.content }}
      </div>
    </div>
  </article>
</template>
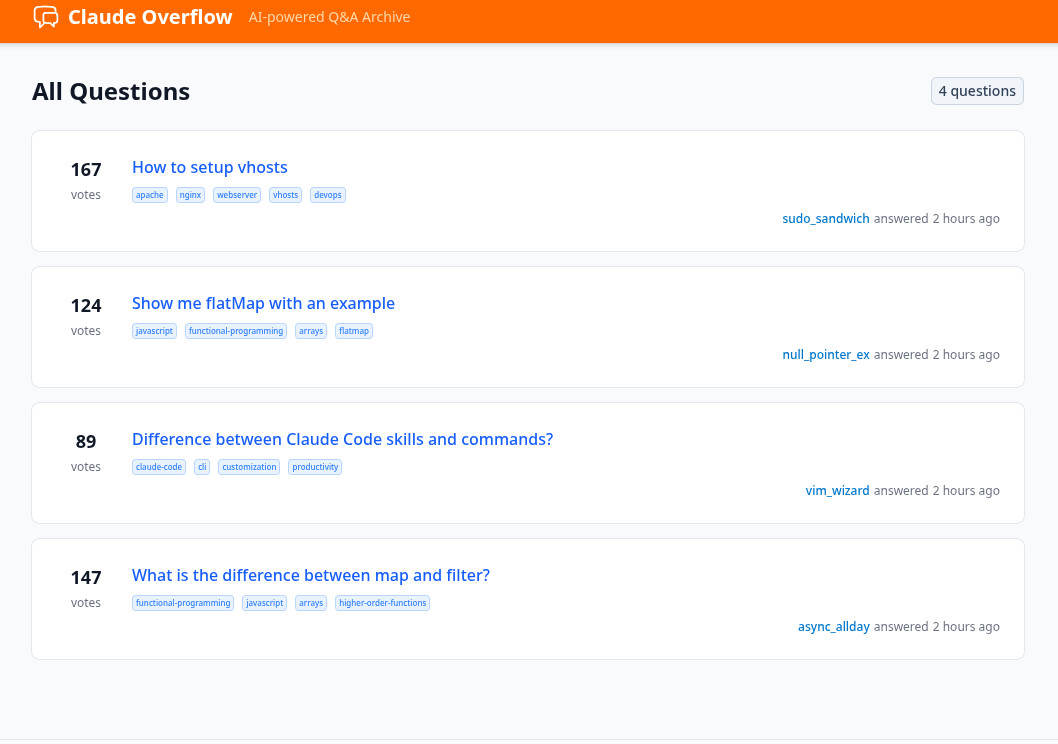
The UI looks like a simplified StackOverflow - questions list, answer detail with votes and comments.
How It All Fits Together
Here's the flow when you ask a technical question:
- SessionStart hook runs
setup.sh- Creates
/tmp/claude-overflow-{session}/ - Copies Nuxt template
- Starts dev server on port 4242
- Injects config into Claude's context
- Creates
- UserPromptSubmit hook injects the reminder about the overflow skill
- Claude sees the reminder and decides to use the skill for technical questions
- The skill executes
- Claude reads the config from its context
- Generates slug, author, votes, comments
- Uses the Write tool to create a markdown file
- Tells the user the URL
- Nuxt Content hot-reloads and the answer appears in the web UI
- SessionEnd hook runs
cleanup.shto stop the server
What I Learned
Hooks are powerful but limited to shell commands. You can't run arbitrary code - everything goes through bash. For complex logic, write a script and call it.
The hookSpecificOutput JSON is how you communicate with Claude. Whatever you put in additionalContext gets added to Claude's context. This is how SessionStart passes config that skills use later.
Skills vs Commands: Skills are for Claude to invoke programmatically. Commands are for users to trigger explicitly. You often want both pointing to the same capability.
No MCP server needed for file operations. Claude has a native Write tool. Skills can just tell Claude what to write and where.
Session isolation matters. Each session gets its own temp directory and server port. This prevents conflicts when running multiple sessions.
Ways to Extend
The current implementation is session-scoped - each session gets its own temp directory and server, and everything disappears when the session ends. But there are some interesting directions to take this:
System-wide server - Instead of spinning up a new server per session, run a single persistent server that all sessions write to. Every Claude conversation across your machine contributes to the same knowledge base.
Persistence mode - Add a flag to save content to a permanent directory instead of /tmp. Your Q&A archive survives across sessions and machine restarts.
Custom directory - Let users specify where content gets saved. Point it at a git repo and you've got version-controlled knowledge.
Team knowledge base - This is where it gets interesting. An org could run a shared Claude Overflow instance. Every developer's AI conversations contribute to a collective knowledge base. Junior devs browse answers from senior devs' sessions. Onboarding gets easier because common questions are already answered.
The plugin system is flexible enough to support all of these. The SessionStart hook just needs different logic for where to write and whether to start a server.
Try It
The full code is on GitHub: claude-overflow
Clone it, run claude --plugin-dir /path/to/plugin, and ask some technical questions. The answers accumulate in a local knowledge base you can browse.
Most of us "figured things out" by copying from StackOverflow. You'd find an answer, read it, understand it, then write it yourself. That process taught you something.
With AI doing everything now, that step gets skipped. This brings it back - a knowledge base you can browse, copy from, and actually learn from.